Monday, March 28, 2016

Star Wars AT-ST

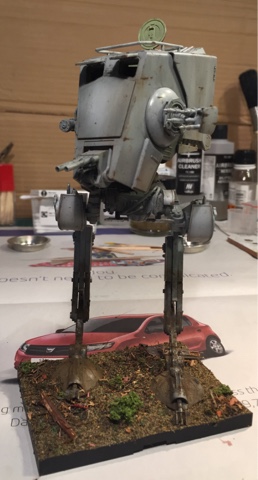
Finally finished my Bandai Star Wars AT-ST. I'm really pleased with how it has come out. I've given it some heavy weathering. At 1/48 scale, it's the biggest kit I've completed so far. I'm gradually moving from 1/72 up to 1/35. 

Scored a 3rd out of 17 entrants in the club competition so others thought it was good too!

The kit
The Bandai kit is a dream to put together. The engineering is superb. Little glue needed. Only warning according to others on the internet is the plastic doesn't play well with white spirit so cover it in heaps of varnish before weathering and use odourless thinners instead of white spirit.  I didn't have any problems. 

The build
I really couldn't believe how easy this thing was to put together. Lots of parts to cleanup but the fit was superb. I wish all kits were like this. 

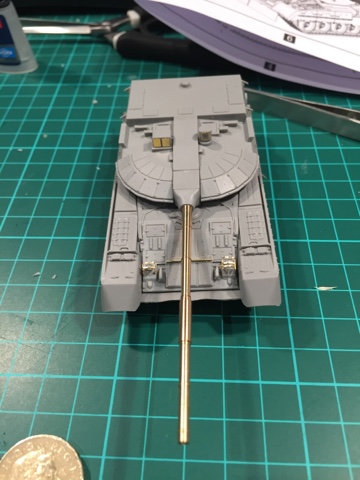
Here are all the major bits ready for painting. 

And here is some extra detailing on the cockpit which will never see the light of day as I eventually decided to glue the roof on. I used bits and bobs from a spare Sd.Kfz.251 kit plus added the seat handles, head rest and seat cushions from wire and plastic card. 


Painting
Having all the parts separate was a little bit of a pain but it did make it easier. 

Started with the cockpit. Used Tamiya paints. My own green mix plus Tamiya NATO black for the instrument panels. 

Also tried out Vallejo acrylic washes. Green wash looks great but wiring time is measured in minutes which doesn't really suit me. 


First coats were painted separately. Used Tamiya Medium Sea Grey lightened and darker with white and NATO black. 

Then I put the bits together. 


And while the pictures don't show it, I did have to respray the head once assembled as the separate panels with their separate paint jobs didn't really go together. 

I then coated the legs, head and chassis with heaps of Tamiya gloss varnish to protect the finish for weathering. 
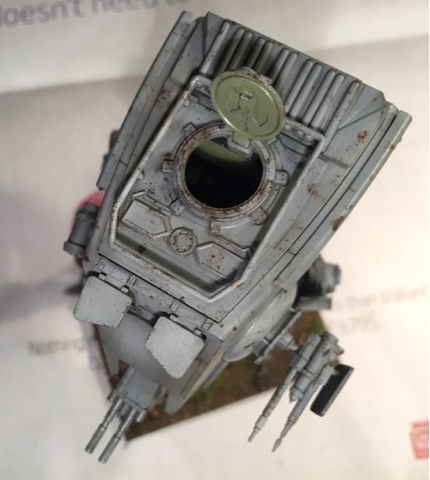
Weathering
I wanted to create more than just a clean looking AT-ST from the movie. I wanted a worn finish. 

I did a pin wash using MIG Dark Wash to bring out details as well as add some grime and rain marks. 

I did chipping using Vallejo German Camoflage Brown. After a little trial and error with a very used dish washing sponge, I found the technique worked quite well. I used AK Rust wash on the big chips as well as in the smaller marks. What I should have done also is chipping using lighter colour grey paint for where the paint was scraped but not all the way through. 

Brown AK Dark Earth pigment was used around the feet along with fixer to make it stick. Excess was rubbed away with a brush. Given this was the first time I have used this technique, I was pretty happy with the result. I also rubbed some pigment into random places on the head, chassis and legs for a dusty effect. 

Chewbacca
Chewbacca was painted with a variety of mixtures of Tamiya flat brown, red brown, NATO black, yellow and chrome silver. 

Nothing like 2 metres of walking carpet to add a sense of scale. 


Diorama
Used the stock based with a base coat of Tamiya Earth textured paint on the top and black along the sides. 

I then put scenery glue on top and added some scenery scatter product, some shrubbery product and a few sticks from the garden. It took a few goes to get everything sticking where I wanted it. 


End result
Totally stoked with how it has all come out. It's a very groovy model with a lot of visual interest. 


Wednesday, February 17, 2016

T-80UM2 Black Eagle Prototype

Onto more modern paper panzers, I bought a very groovy Modelcollect kit of the Russian T-80UM2 "Black Eagle". I've always liked the look of this tank. 

The real deal or not?
The Black Eagle tank (Russian: Чёрный Орёл, Čërnyj Orël, or Object 640), was a presumed prototype main battle tank produced in the Russian Federation . It was thought to have been developed by the KBTM design bureau in Omsk in the late 1990s. A production version of this tank has never been publicly demonstrated. The Black Eagle has been cancelled, with all production and development halted.

A mock-up of the Black Eagle was first demonstrated at the VTTV arms exposition in Omsk, in September 1997, making a single brief pass, far from the reviewing stands. The tank appeared to be a standard T-80U hull, topped by a very large turret and gun, obscured by camouflage netting and canvas. The turret later turned out to be a crude mock-up.


A later prototype had a longer version of the T-80 hull and seven wheels. Then the project was cancelled. 


The kit
The kit is of this mockup version perhaps with later prototype's turret. 


Kit looks good in the box and comes with a brass barrel and PE. There's actually enough parts to build up a good portion of another T-80. Something to think about if you planning on building some T-80s.

Instructions are good with only a few minor errors. 

The build
The build was pretty straightforward apart from the PE headlight guards. PE for rubber trim at front of tank was missing but plastic equivalent was available so no fuss. 

Overall, very easy to put together. Much easier than the Dragon and Revell kits I have built of late. 


Putty Experiments
There was not much in the way of gaps but I had a go with Squadron Green Putty for the first time around the turret. Applies well. Not so sure on result once dry. Mmmmm. 


Primer coat
First step was a primer coat. I used up my remaining bottle of Vallejo Surface Primer in black. While it is better than grey for knowing that your paint is covering up grey plastic, it does make preshading harder. You essentially need to do preshading in reverse using greys and white to highlight the lighter areas. 


Preshading
The pre shading was done with Tamiya White with a spot of black added to it and thinned 50%. Tried to highlight the centre of the panels, hatches and other standout items. Looks groovy. Will need to remember to thin the paint even more when the base coat goes on. 


Painting
Painting was pretty simple. Multiple coats of Tamiya XF-69 NATO Black followed by X-22 Clear and some MIG Dark Wash to bring out some of the details. 

Building the base 
Building the proving ground base proved to be a lot simpler than I thought. I cut some blue styrofoam to shape and then covered it filler. 

This will was followed up with a paste of soil from the back yard (sieved), Russian Dark Earth and Matt Acrylic Paste.