Onto more modern paper panzers, I bought a very groovy Modelcollect kit of the Russian T-80UM2 "Black Eagle". I've always liked the look of this tank.
The real deal or not?


The Black Eagle tank (Russian: Чёрный Орёл, Čërnyj Orël, or Object 640), was a presumed prototype main battle tank produced in the Russian Federation . It was thought to have been developed by the KBTM design bureau in Omsk in the late 1990s. A production version of this tank has never been publicly demonstrated. The Black Eagle has been cancelled, with all production and development halted.
A mock-up of the Black Eagle was first demonstrated at the VTTV arms exposition in Omsk, in September 1997, making a single brief pass, far from the reviewing stands. The tank appeared to be a standard T-80U hull, topped by a very large turret and gun, obscured by camouflage netting and canvas. The turret later turned out to be a crude mock-up.
A later prototype had a longer version of the T-80 hull and seven wheels. Then the project was cancelled.
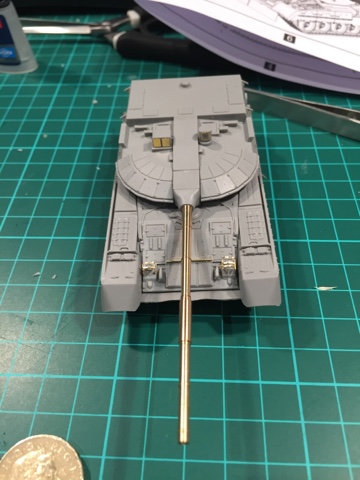
The kit
The kit is of this mockup version perhaps with later prototype's turret.
Kit looks good in the box and comes with a brass barrel and PE. There's actually enough parts to build up a good portion of another T-80. Something to think about if you planning on building some T-80s.
Instructions are good with only a few minor errors.
The build
The build was pretty straightforward apart from the PE headlight guards. PE for rubber trim at front of tank was missing but plastic equivalent was available so no fuss.
Overall, very easy to put together. Much easier than the Dragon and Revell kits I have built of late.
Putty Experiments
There was not much in the way of gaps but I had a go with Squadron Green Putty for the first time around the turret. Applies well. Not so sure on result once dry. Mmmmm.
Primer coat
First step was a primer coat. I used up my remaining bottle of Vallejo Surface Primer in black. While it is better than grey for knowing that your paint is covering up grey plastic, it does make preshading harder. You essentially need to do preshading in reverse using greys and white to highlight the lighter areas.
Preshading
The pre shading was done with Tamiya White with a spot of black added to it and thinned 50%. Tried to highlight the centre of the panels, hatches and other standout items. Looks groovy. Will need to remember to thin the paint even more when the base coat goes on.
Painting
Painting was pretty simple. Multiple coats of Tamiya XF-69 NATO Black followed by X-22 Clear and some MIG Dark Wash to bring out some of the details.

Building the base
Building the proving ground base proved to be a lot simpler than I thought. I cut some blue styrofoam to shape and then covered it filler.

This will was followed up with a paste of soil from the back yard (sieved), Russian Dark Earth and Matt Acrylic Paste.


No comments:
Post a Comment