Sunday, November 16, 2014

Cromwell White Wash Part 2b - The Art of Stripping

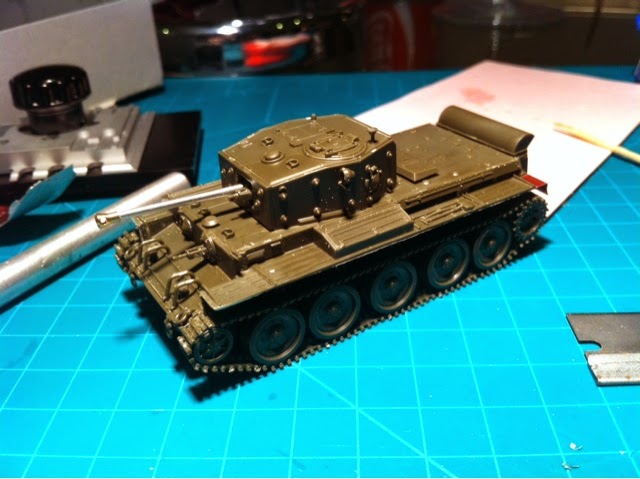
One thing I have learnt after leaving the model soaked in oven cleaner overnight is the Vallejo Primer and the bits painted with Vallejo paints such as the tracks and wheel rubber are pretty tough stuff. The Tamiya paint is gone. 


Now to start again. 

Cromwell White Wash Part 2a - Back To The Drawing Board

Back to the drawing board.

I tried putting Vallejo's chipping medium on the Cromwell thinned about 4:3 medium to water. Result was little bubbles rather than a smooth coat. Didn't change much after it dried. 

Then added a few coats of XF-2 white. Still didn't look great. Tried chipping away at the turret but the effect was more of a bubble effect not a washed away white wash. 


Tried a bit of thinner treatment but that didn't work too well either. 

In the end I decided to try out using oven cleaner to strip the thing and start again. Works well for the top coat of Tamiya after a few hours but not so good on the Vallejo primer except for the metal bits. 


Have soaked the whole thing in oven cleaner overnight and put it outside. Let's see what it looks like tomorrow. Mmmm. 

Will need to hit the online forums and see how else I can do this. Maybe thinned chipping medium and lots of coats of it. I'll try it out on my test tanks first. 

So disappointing as I was completely loving the look of the Cromwell up till now. 

Monday, November 3, 2014

Panther G with Anti Aircraft Armour Finished ... Sort Of

For a long long time, I've been fascinated by the anti aircraft armour fitted to the panther tanks of Panzer Regiment 26 in Italy 1944 and wanted one of my own for my tank collection. 

Here is they looked like in Panzerwrecks (destroyed German tank porn)


To build an example, I purchased the early Panther kit by Dragon ...

and the the ET Model upgrade kit plus some plastic rod. 

And that was as far as it got for a while. Eventually I pulled out the kit and assembled it. Was a bit disappointed by the quality of the Dragon kit compared to Revell as some of the parts needed a lot of cleanup and the plastic didn't feel like a real quality product. Then came the fiddly bit - assembling the ET Model upgrade kit and putting it on the Panther. Really f@&king awkward but got there in the end although I didn't bother with the butterfly wing nuts the size of a full stop. I have no idea how any one fits that stuff. Also added some ammo boxes to the engine deck to give the impression that it was being reloaded. Also made the tow cables extra long and hanging downs with one attached to the front shackle as had seen that one someone else's panther and thought it was more interesting. Should have paid more attention to measurement as the cables are really too long and one is longer than the other. I did however scratch billy old brackets for them at the back using spare photo etch. Anyway. That's the build. 

I primed the tank with Vallejo Grey and Black primer with the idea that I would spray so lightly that the shadows would come through. Fail. But here's some pictures of the attempt!


Innovation wise however, I have taken to super gluing the turret and body into the ends of sringes formerly used to administer medication to the cat. Or the top of a bottle opener. Much easier. 

Painting wise, I painted the bottom half of the chassis in XF-60 Dark Yellow and then sprayed the rest with a Dark Yellow mix lightened with XF-2 White probably in a ratio of 50:50. I probably should have done the wheels with the same mix as that looked a bit weird later on. Glad I did lighten the mix however as applying washes darkens the model considerably - especially with the zimmerit. 

Next thing was adding some green camouflage as per the picture on the box. I ended up doing this free hand for the first time with the airbrush using XF-61 Dark Green. Had a few issues but nothing major. Might think about dropping the pressure some next time to around 12-15. The XF-61 Dark Green ended up being a bit too dark so over sprayed it lightly with my Dark Yellow / White mix to tone it down some. 

Oh ... I should add that I thought I'd try out the hairspray technique on the anti aircraft armour so painted that with Vallejo's Rust & Chipping Effects paint set and chipping fluid before painting the tank overall. Then had a play at chipping and probably over did it. Still, it does make the model look more interesting. 

While I had the rust effects set out, I decide to paint the spare tracks using various shades. And while I was at it, painted all the other details with various Vallejo paints. Wheels and tracks were painted using the AK Tracks & Wheels set. Great set. Will get a lot of use. 

Next step was a X-22 Gloss varnish finish in preparation for the decals. Tried Decal Fix again as I was struggling to get the numbers to fit over the zimmerit. While it is a bit 'hot' chemically, I let it dry overnight and it worked great! Painted over the decals with more X-22 Gloss Varnish then moved onto washes. 

Washes have never worked well up to now so I thought I'd try something a bit new and made my own wash from burnt umber oil paint and leave more wash around the details. Also tried another go at pin washes for some of the panel lines. Once it dried, I was really happy with the results - especially around the wheel nuts and the panel lines. Then XF-86 Flat Clear varnish for the next stages of weathering. 

Next stage weathering was some light mud using various AK potions and plaster powder including first Kursk Earth and then Dust Effects. Sprayed Dust Effects over the whole model and also put some dots here and there around details. Ended up over doing it but the great think about using these enamel/oil based paints is you can remove and rework things. Other products used were MIG Dark Wash on the tracks and amp boxes, AK's Fuel and Engine oil stains potions on the engine deck and around the wheels plus a graphite pencil along the edges of things for definition plus to add a few scratches. For contact part of tracks, I dry rushed on Vallejo Oily Steel which came in one of the Panzer Aces paint sets I bought yonks ago. 

Decided not to play with pigments this time around as no idea really what to do with them. 

So here is the result, photographed using freshly painted blue paper as a background (makes the colours come out better).


Is it finished?  Not quite. I am experimenting with some mesh to use as chicken wire that the tank crew used to attach foliage to use as camouflage. It might be a little to hard with this scale so I might just use foliage by itself. Stay tuned. 

Sunday, November 2, 2014

Cromwell White Wash Part 1

Needing a change from German tanks, I decided to have a crack at a British tank. I originally was going to have build the Cromwell I had in my stash along with the Blackdog hessian kit but chickened out and decided to do a white washed version that I had seen in British Steel.

So here is the kit. 

Here is the target look. 


Assembly went together fairly easy and I only lost one bit to the carpet monster - one of the holders for the aerial. Main changes from spec were chopping the front fenders off, replacing the mud guards with mud flaps made from wine bottle foil. Also made a jerry can holder from wine foil as well. Barrel was an Aber item as were the 2m aerials. Decided to make one aerial shorter than the other as they apparently came in 4 foot screw together sections and it adds visual interest. Stowage is from Value Plus. 


Next step was priming. Used Vallejo Black Primer as usual and then started researching how to mix British SCC15 green using Tamiya paints. Settled on a recipe of 5 parts XF-61 Dark Green, 2 parts XF-62 Olive Drab and XF-3 Flat Yellow. 

Then lightened it with 2-3 parts XF-2 White for the top of the turret and the top of the hill. Was pretty happy with result. Then sprayed with X-22 Gloss in preparation for decals. 

Instead of putting the decals, I decided to try out a blue green oil filter using my set of oil paints as suggested in the British Steel book as I was figuring the green looked a bit light. Tried brushing it on which left brush marks so next day, had a go at spraying it in. Didn't work out well at all - especially on the back hull desk. I think it was due to the oil pigments not being fine enough and some mild orange peel. Starting to think Tamiya doesn't spray as well as I'd like. Have heard some people add some Satin Gloss to get rid of the powdery feel.  

Then decided to use MIG Dark Wash all over. This worked out much better and it allowed me to clean off all the blue green filter as well as make the details 'pop' out. Lots of detail wiping and polishing with cotton buds and my OO brush delivered a result I was pretty happy with.


Next step is another coat of gloss and having a go at the hairspray technique for the white wash. 

Saturday, September 27, 2014

Sd.Kfz. 251/1 Ausf C "Stuka zu Fuss"

My fourth model completed in June/July 2014 was another Sd.Kfz.251.  This time the 251/1 II - Rocket launcher (called "Stuka zu Fuß" (Walking Stuka) or Wurfrahmen 40) equipped with six side mounted frames for launching 280 mm or 320 mm Wurfkoerper rockets.  I don't have one of these in my collection so it was time to start.

So here is a few war time pictures of the beast.


I did something different with this one and basically tried to follow the step by step directions from an article by Kamil Feliks Sztarbala in the March 2014 issue of Model Military International magazine.

Paints and techniques used
  • The model was primed using Vallejo Surface Primer in black (running gear) and German primer red (interior and outside) as per the magazine article.
  • Interior was sprayed with chipping fluid but could have easily have used hairspray.  Then used Tamiya XF-57 Buff as the main colour and XF-55 Deck Tan over top as a highlight but not sure that works well in this scale.  The scrapped away some paint and voila! chipped interior!
  • Sprayed outside with XF-15 Flesh with highlights of XF-15. This worked really well despite me using too much paint as usual. It's hard to leave some of the primer showing through. Shadows enhanced with XF-26 Clear Orange. Not sure what I think about that to be honest.  
  • For tracks, tires and rubber, I used paints from AK Interactive's AK557 Tracks and Wheels set.  This is a really brilliant set.  I'm going to get a huge amount of use out of this.  
  • Small details such as the wooden rocket crates, rockets were painted with a couple of Vallejo paints I've accumulated.  Metal bits were done with Humbrol.
  • Varnish used was from Tamiya. did make the mistake of not gloss varnishing the spot where the decals were to go first which caused some problems

Weathering wise, I pretty much did the same as for the Sd.Kfz.7/1 and other models but was a bit more subtle with the chipping.  Not totally happy with the chipping on the bonnet but live and learn. I did following the instructions in the magazine and try different mud and dust shades which I think worked well. 

Here's what Kamil Feliks Sztarbala did in 1/48 scale.


And here's what I did in 1/72 scale although a slightly different vehicle and no base.


Lessons for next time

  • Don't paint so thickly.  Let the undercoat shine through.  Easier said than done.
  • Don't do too much chipping - espeically at 1/72 scale.
  • Don't worry too much about the contrast between the XF-15 and XF-55 before weathering. I toned out the XF-15 too much with XF-55 Deck Tan.
  • Fill in all the moulding holes that are visible. 

Overall, I like how this model is a lot less monochrome in finish than the last one. There is a lot more visual interest there. In fact, it sits on my shelf and I can't stop looking at it.   I think it's my best model yet.