Saturday, September 27, 2014

Sd.Kfz. 251/1 Ausf C "Stuka zu Fuss"

My fourth model completed in June/July 2014 was another Sd.Kfz.251.  This time the 251/1 II - Rocket launcher (called "Stuka zu Fuß" (Walking Stuka) or Wurfrahmen 40) equipped with six side mounted frames for launching 280 mm or 320 mm Wurfkoerper rockets.  I don't have one of these in my collection so it was time to start.

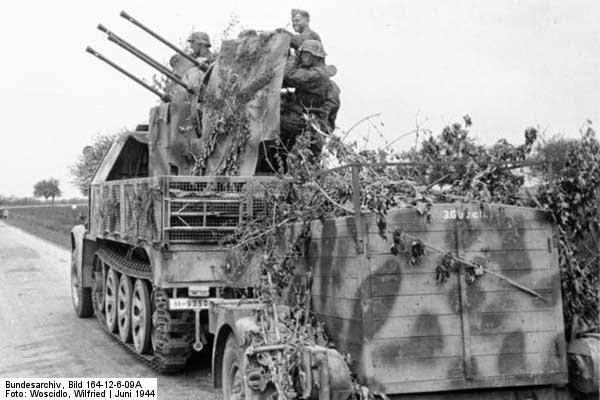
So here is a few war time pictures of the beast.


I did something different with this one and basically tried to follow the step by step directions from an article by Kamil Feliks Sztarbala in the March 2014 issue of Model Military International magazine.

Paints and techniques used
  • The model was primed using Vallejo Surface Primer in black (running gear) and German primer red (interior and outside) as per the magazine article.
  • Interior was sprayed with chipping fluid but could have easily have used hairspray.  Then used Tamiya XF-57 Buff as the main colour and XF-55 Deck Tan over top as a highlight but not sure that works well in this scale.  The scrapped away some paint and voila! chipped interior!
  • Sprayed outside with XF-15 Flesh with highlights of XF-15. This worked really well despite me using too much paint as usual. It's hard to leave some of the primer showing through. Shadows enhanced with XF-26 Clear Orange. Not sure what I think about that to be honest.  
  • For tracks, tires and rubber, I used paints from AK Interactive's AK557 Tracks and Wheels set.  This is a really brilliant set.  I'm going to get a huge amount of use out of this.  
  • Small details such as the wooden rocket crates, rockets were painted with a couple of Vallejo paints I've accumulated.  Metal bits were done with Humbrol.
  • Varnish used was from Tamiya. did make the mistake of not gloss varnishing the spot where the decals were to go first which caused some problems

Weathering wise, I pretty much did the same as for the Sd.Kfz.7/1 and other models but was a bit more subtle with the chipping.  Not totally happy with the chipping on the bonnet but live and learn. I did following the instructions in the magazine and try different mud and dust shades which I think worked well. 

Here's what Kamil Feliks Sztarbala did in 1/48 scale.


And here's what I did in 1/72 scale although a slightly different vehicle and no base.


Lessons for next time

  • Don't paint so thickly.  Let the undercoat shine through.  Easier said than done.
  • Don't do too much chipping - espeically at 1/72 scale.
  • Don't worry too much about the contrast between the XF-15 and XF-55 before weathering. I toned out the XF-15 too much with XF-55 Deck Tan.
  • Fill in all the moulding holes that are visible. 

Overall, I like how this model is a lot less monochrome in finish than the last one. There is a lot more visual interest there. In fact, it sits on my shelf and I can't stop looking at it.   I think it's my best model yet.  

Sunday, July 6, 2014

The Sd.Kfz 7/1 ala Normandy (or Falaise Gap)

Finally finished Model #3.  Actually, it's been started, stopped, re-started and finished for some time in a way but it was never going to be fully finished unless it was covered in foliage and pretending to be a bush in order to escape Allied 'Jabos'. 

So what is it?  The Sd.Kfz 7/1 was a a specialist anti-aircraft variant of the Wehrmacht's highly successful 8 ton Sd.Kfz. 7 prime mover.   Fitted with either the quadruple 2cm Flak 38 mounting or a single 3.7cm Flak 36, 442 examples were adapted in this way, making it a significant sub-variant of the original vehicle.

The kit itself is from Revell.  I've done mine up in the colours of the Sd. Kfz. 7/1 of Flak-Regiment 79 (motorisiert), 1 Flak-Brigade, Normandy, 1944 plus added some foliage as camouflage as per the photos I've seen on the internet below.

Paints and techniques used
  • The model was primed using Vallejo Surface Primer in black (70.602).
  • Paint wise, I used the Dunkelgelb aus '44 DG I and Resedagrun from AK Interactive's 1945 German Late War Colours (AK 554) set without any modification.  
  • Filter wise, I got a bit scared of the The Filter variety as it seemed messy and made up my own acrylic version.  Not sure it made a lot of difference and I'm probably cool with The Filter stuff now having completed Model #2.
  • Vallejo Satin Varnish (70.522) was used to seal the model ready for weathering although I did have some issues with bits melting off and having to be re-glued so not sure how well that worked or how well I painted on the varnish. 

Weathering techniques used.
  • MIG Productions Dark Wash was used for the washes. The excess was cleaned away with white spirits. That's what caused bits to follow up.  It's a bit 'hot'.  Have order the AK version plus AK turpentine to see if that causes less issues in future.
  • I painted on chips using using 71.042 Camouflage Black Brown frpm Vallejo's Rust & Chipping Effects set.  This was followed up by AK Rust Streaks around the bolts again and the chips plus a little streaking.  Somewhere I screwed up on something and I do notice some weird yellow orange effect on the front of the armoured cabin.  Mmmmm.
  • I used graphite pencil along the edges of the panels for more definition as well creating more scratches. Also on the raised parts of the tracks.
  • The whole model was thinly coated (from a distance) with AK Interactive's Dust Effects (AK015) with some heavy coating around the tracks and front wheels.  I liked the overall effect.  It toned down the colours and made the green stripes look less garish. 
  • The foliage was based on Heki #1672 foliage.  Looks great.  And covers up some of my mistakes. Ha ha ha.  it could probably do with some more foliage based on some pictures I have seen but I decided not to overdo it.

Here's the kit


Here's the source photos I used to inspire my foliage fetish


Here are some photos taken on the iPhone.


Overall, I am pretty happy with how it's turned out - especially as I don't have one of these in my collection of WW2 German AFVs.  I think it's a pretty spectacular looking model with the foliage.  Obviously, there's some bits wrong that could do with some improvement but that's another model.

Wednesday, May 28, 2014

Sd.Kfz.171 Panther G Early Production w/ Zimmerit #1

Sometime ago, I spotted a guy selling two built but not painted Panther G tanks for £10 on eBay and thought they would be great models to learn painting techniques on.

I also wanted to try out the Tamiya paint route to getting a decent shade of Dunkelgelb and use more of the AK weathering products that I had bought.

Paints and techniques used.
  • The model was primed using Vallejo Surface Primer in black (70.602).  This sprays easily from the bottle with not a lot of thinner.  It's a really nice product.
  • I used Tamiya XF-60 Dark Yellow lightened with XF-2 Flat White thinned by about 40-50%.  I can't remember the proportions of dark yellow and flat white exactly as I played around with it a bit over several coats.  
  • I also tried some basic colour modulation by spraying a much lighter shade on the top edges of the tank where the light hits.  
  • The Tamiya paint sprays much better than the Lifecolor paint I used on the Sd.Kfz. 251/16.  In retrospect, I could have gone a lot lighter as the weathering process really darkened the end result.  Something to think about for next time.
  • Detailed bits were painted with various Vallejo Model Color from a Panzer Aces set. 
  • Vallejo Satin Varnish (70.522) was used to seal the model ready for weathering.
Weathering products and techniques used
  • MIG Productions Dark Wash was used for the washes. The excess was cleaned away with white spirits. 
  • AK Streaking Grime was used for streaks on the side. This is a hard technique to get right as I difficulty I had painting thin lines appropriate for a 1/72 scale model. 
  • I created scratches on the schurzen using a knife. I then painted the scratch using 71.042 Camouflage Black Brown frpm Vallejo's Rust & Chipping Effects set.  This was followed up by AK Rust Streaks on top plus a little streaking.  
  • The combination of those two products also worked really well for chipping although I over did it a bit around the hatches.  Subtlety is the key here.  I do like the chipping effect on the gun barrel and the cylindrical container on the left hand side.
  • Liking the rust effect, I also used AK Rust Streaks as a wash around the top of the turret, the engine deck and the spare tracks.
  • I used the AK Heavy Muddy Weathering Set with AK Summer Kursk Earth for the mud base around the wheels, tracks and front and back of the tank. Also did the mud splatter thing again.  Probably over did it.  One does seem to lose some definition from the washes when using the mud around the wheels.  I should experiment with using a wash over the mud at some point.
  • AK's Oil Stains was used around the hubs of the wheels and the rear engine deck.  
  • I used graphite pencil along the edges of the panels for more definition as well creating more scratches. Also on the raised parts of the tracks.
Here's the original kit

And here's what I did with it


Overall, I am pretty happy with the result.  The model looks a shade darker in reality than the photos.  Will need to learn how to photograph these things properly at some point.

PS: The sharp eyed among you will notice that the gun mantlet was put on upside down.

Sd.Kfz.251/16 Flammpanzerwagen

So here's the first one I've finished.  It's actually an armored personnel carrier (APC) fielded by the Germans in World War II.  One of the first in fact. The Sd.Kfz. 251 Schutzenpanzer was the forerunner of the APCs of today. This is Revell's 1/72 version of the Sd.Kfz. 251/16 Ausf C with the armed with two MG42 machine guns and two flamethrowers.

It was fairly easy to build although a bit fiddly given all the small parts.  I painted the interior first, then glued the hull together, and painted the model in sub assemblies. Some solder was used for the fuel lines to the flamethrowers.

Paints used
  • For the Dunkelgelb, I used UA250 ground colour from the Lifecolor MS01 Dunkelgelb Contrast & Desaturation set.  It was a bit of a pain to spray and I think the result looks a bit dark. I did consider the the UA249 flashed shade in the set but it looked way to light so I didn't try it.  Also, weathering does darken things so something to bear in mind for next time.  The finish also looks monochrome. Need to try some colour modulation or maybe oil fading techniques to change that.
  • For tracks, tires and rubber, I used paints from AK Interactive's AK557 Tracks and Wheels set
  • Remaining paints were a Humbrol metallic for the guns and various Vallejo paints from some Panzer Aces sets I bought a while back.  
Weathering products used
  • I made my own water based filter although I can't remember the paint I used. I didn't like the oil based The Filter Brown for Dark Yellow that I tried on a test model.  
  • MIG Productions Dark Wash was used for the washes. The excess was cleaned away with white spirits. Struggled a bit with this technique
  • AK Streaking Grime was used for streaks.
  • AK Summer Kursk earth was used for the dirt.  I flicked some of this using a brush and a tooth pick.  
  • Graphite pencil along the edges of the panels for more definition.

Here's the box art.

And here's what I did.