My first completed foray into post war armour is the T80B - the worlds first gas turbine powered tank and the premier tank in the Red Army up to the collapse of the Soviet Union.
For details, check Wikipedia. https://en.m.wikipedia.org/wiki/T-80
The T-80B
Here are a few snaps of the real thing.


The kit
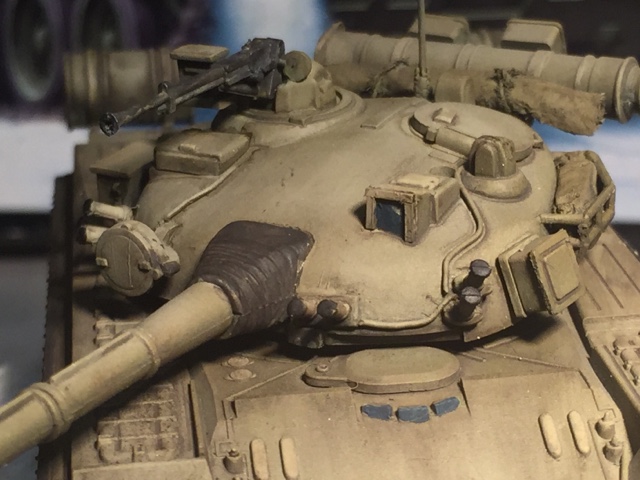
The kit is the Revell T-80B 1/72 kit.  The kit is basically sound but it does miss a few key features that are really irritating - especially as the box art and the painting guide show them.
Key features missing are
- dozer mine clearing blade on the front
- light near machine gun
- electric cabling on the turret
- unditching log at rear
- aerial mounting
- several smoke launchers.
Some of the forums say the turret is slightly the wrong shape but I wasn't going to do much with that.
The build
The build was fairly straight forward for a Revell kit. The only real issues were the seam lines on the barrels which I didn't quite resolve.
Key changes to the kit were:
- I scratch built the front mud flap to cover up the lack of dozer blade from plastic card. Also a mud strip above it and strips behind to simulate the dozer blade
- added chain to the front row hooks
- made an aerial out of plastic rod with the aerial shaped with putty
- made the machine gun headlight from an end of sprue
- tarpaulins on the back and in the stowage unit were made from tissue paper soaked in PVA glue.
- log made from plastic sprue. Brackets were made from Tamiya masking tape and sprue. The tape is probably too wide but doesn't look too bad.
- frame around gunners sight made from plastic strip.
- heavy wiring behind headlights and on turret made from thin solder wire.


Painting
Painting was a rather hurried affair over the space of a few evenings.
First I undercoated the model with Vallejo black primer. Next I sprayed it with Post War Russian Green from the Mig AMMO Russian Green smart set.

I then did a little colour modulation by lightening the mix with white and then painted some of the smaller features with the lightest mix to make them stand out more.
Tracks, wheels and the rubber skirts were treated with paints from AK Interactive's Tracks and Wheels set. I've used this set for a lot of my models and it works very well.

Remaining features were painted with an assortment of Vallejo paints.
The model was then sprayed with Matt Tamiya varnish to protect it. Normally I would use a gloss as that is better for washes but I didn't feel I had the time as I was working to a club competition deadline.

Weathering
Not happy with the lightness of the Russian green due to my over modulation and the use of a medium tip instead of fine, I coated the thing in a dark wash as a filter and then brushed away the excess around key features. Worked okay. While it was a bit dirty than I wanted, I was pretty happy with the finished product. It definitely has visual interest.
After that followed some mud splashes around the perimeter before fixing it to the diorama base with PVA glue.


The diorama
The started off as a small pre-cut base with a layer of plaster on top of it. I then pressed the tank into it to make tracks while the plaster was still wet.
Once dry, the plaster was coated with Deluxe Scattergrip followed by a coat of Deluxe Scenic Snowflakes.


I wasn't really happy with the result as the snow seemed too big for 1/72 scale so then coated it with Deluxe Scenic Shovelled Snow.

Result was okay but fiddly to make stick. Coated the tank tracks with PVA and then more Shovelled Snow. Snowman was made from PVA and Shovelled Snow.
The result
Scored a Bronze vs 11 other models at the December 2015 club night. I think the weathering and diorama made it stand out from the other models despite it's diminutive size.

No comments:
Post a Comment