Wednesday, February 17, 2016

T-80UM2 Black Eagle Prototype

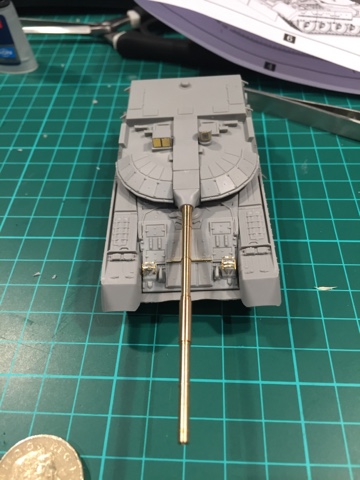
Onto more modern paper panzers, I bought a very groovy Modelcollect kit of the Russian T-80UM2 "Black Eagle". I've always liked the look of this tank. 

The real deal or not?
The Black Eagle tank (Russian: Чёрный Орёл, Čërnyj Orël, or Object 640), was a presumed prototype main battle tank produced in the Russian Federation . It was thought to have been developed by the KBTM design bureau in Omsk in the late 1990s. A production version of this tank has never been publicly demonstrated. The Black Eagle has been cancelled, with all production and development halted.

A mock-up of the Black Eagle was first demonstrated at the VTTV arms exposition in Omsk, in September 1997, making a single brief pass, far from the reviewing stands. The tank appeared to be a standard T-80U hull, topped by a very large turret and gun, obscured by camouflage netting and canvas. The turret later turned out to be a crude mock-up.


A later prototype had a longer version of the T-80 hull and seven wheels. Then the project was cancelled. 


The kit
The kit is of this mockup version perhaps with later prototype's turret. 


Kit looks good in the box and comes with a brass barrel and PE. There's actually enough parts to build up a good portion of another T-80. Something to think about if you planning on building some T-80s.

Instructions are good with only a few minor errors. 

The build
The build was pretty straightforward apart from the PE headlight guards. PE for rubber trim at front of tank was missing but plastic equivalent was available so no fuss. 

Overall, very easy to put together. Much easier than the Dragon and Revell kits I have built of late. 


Putty Experiments
There was not much in the way of gaps but I had a go with Squadron Green Putty for the first time around the turret. Applies well. Not so sure on result once dry. Mmmmm. 


Primer coat
First step was a primer coat. I used up my remaining bottle of Vallejo Surface Primer in black. While it is better than grey for knowing that your paint is covering up grey plastic, it does make preshading harder. You essentially need to do preshading in reverse using greys and white to highlight the lighter areas. 


Preshading
The pre shading was done with Tamiya White with a spot of black added to it and thinned 50%. Tried to highlight the centre of the panels, hatches and other standout items. Looks groovy. Will need to remember to thin the paint even more when the base coat goes on. 


Painting
Painting was pretty simple. Multiple coats of Tamiya XF-69 NATO Black followed by X-22 Clear and some MIG Dark Wash to bring out some of the details. 

Building the base 
Building the proving ground base proved to be a lot simpler than I thought. I cut some blue styrofoam to shape and then covered it filler. 

This will was followed up with a paste of soil from the back yard (sieved), Russian Dark Earth and Matt Acrylic Paste. 


Tuesday, February 16, 2016

Panther F ala Adam Wilder

I've had the Hasegawa Panther F 1/72 in the stash for quite a while. After looking at Adam Wilder's 1/35 example in his how to book on armour modelling, I decided to build one to look kind of like it. Sort of. 

The kit

The Inspiration


The Build
First of all, what a shit kit compared to Dragon's Panther G. Dimensionally it looks wrong and the plastic just isn't as detailed as an equivalent effort from Dragon. And no PE grills. I wish Dragon did an Ausf F as that would have been a far better base kit to use for what I had in mind. 

Still, it was a relatively easy build. I opened up the wireless operator's hatch on the right hand side. It's quite a bodge job and will definitely need a figure in there to cover the edges. I scratch built the hatch. 

I also scratch built the schurzen, spareand a few other bits. I relocated tools and other bits including the tube on the side for storing the barrel cleaning rods. 

Tracks and headlight (lost) were from a Revell Panther G kit. 


Undercoat and preshading
Schurzen was removed for painting. Everything was undercoated with Vallejo Grey Surface Primer. It's generally good stuff but really hard to see what you have painted on grey plastic. 


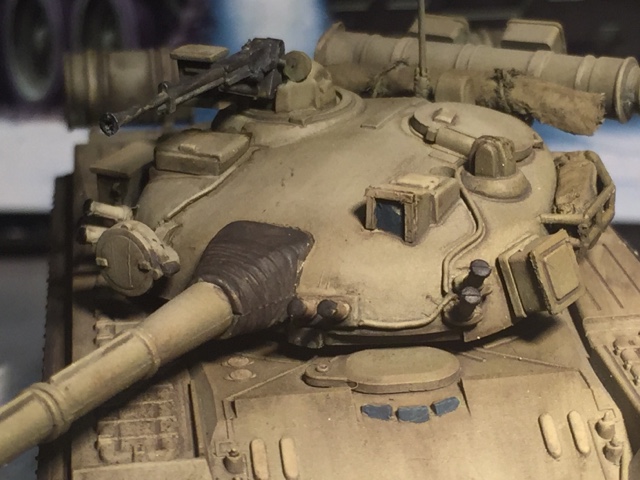
Had a look at a Black & White technique book and decided I'd have crack at that so added additional preshading and painted details white. 

To be continued. 

Tuesday, December 22, 2015

T-80B Main Battle Tank


My first completed foray into post war armour is the T80B - the worlds first gas turbine powered tank and the premier tank in the Red Army up to the collapse of the Soviet Union. 

For details, check Wikipedia. https://en.m.wikipedia.org/wiki/T-80

The T-80B
Here are a few snaps of the real thing. 


The kit
The kit is the Revell T-80B 1/72 kit. 
The kit is basically sound but it does miss a few key features that are really irritating - especially as the box art and the painting guide show them. 

Key features missing are
- dozer mine clearing blade on the front
- light near machine gun
- electric cabling on the turret
- unditching log at rear
- aerial mounting
- several smoke launchers. 

Some of the forums say the turret is slightly the wrong shape but I wasn't going to do much with that. 

The build
The build was fairly straight forward for a Revell kit. The only real issues were the seam lines on the barrels which I didn't quite resolve.

Key changes to the kit were:
- I scratch built the front mud flap to cover up the lack of dozer blade from plastic card. Also a mud strip above it and strips behind to simulate the dozer blade
- added chain to the front row hooks
- made an aerial out of plastic rod with the aerial shaped with putty
- made the machine gun headlight from an end of sprue
- tarpaulins on the back and in the stowage unit were made from tissue paper soaked in PVA glue. 
- log made from plastic sprue. Brackets were made from Tamiya masking tape and sprue. The tape is probably too wide but doesn't look too bad. 
- frame around gunners sight made from plastic strip. 
- heavy wiring behind headlights and on turret made from thin solder wire. 


Painting
Painting was a rather hurried affair over the space of a few evenings. 

First I undercoated the model with Vallejo black primer. Next I sprayed it with Post War Russian Green from the Mig AMMO Russian Green smart set. 
I then did a little colour modulation by lightening the mix with white and then painted some of the smaller features with the lightest mix to make them stand out more. 

Tracks, wheels and the rubber skirts were treated with paints from AK Interactive's Tracks and Wheels set. I've used this set for a lot of my models and it works very well. 
Remaining features were painted with an assortment of Vallejo paints. 

The model was then sprayed with Matt Tamiya varnish to protect it. Normally I would use a gloss as that is better for washes but I didn't feel I had the time as I was working to a club competition deadline. 


Weathering
Not happy with the lightness of the Russian green due to my over modulation and the use of a medium tip instead of fine, I coated the thing in a dark wash as a filter and then brushed away the excess around key features. Worked okay. While it was a bit dirty than I wanted, I was pretty happy with the finished product. It definitely has visual interest. 

After that followed some mud splashes around the perimeter before fixing it to the diorama base with PVA glue. 


The diorama
The started off as a small pre-cut base with a layer of plaster on top of it. I then pressed the tank into it to make tracks while the plaster was still wet. 

Once dry, the plaster was coated with  Deluxe Scattergrip followed by a coat of Deluxe Scenic Snowflakes. 

I wasn't really happy with the result as the snow seemed too big for 1/72 scale so then coated it with Deluxe Scenic Shovelled Snow. 


Result was okay but fiddly to make stick. Coated the tank tracks with PVA and then more Shovelled Snow. Snowman was made from PVA and Shovelled Snow. 

The result
Scored a Bronze vs 11 other models at the December 2015 club night. I think the weathering and diorama made it stand out from the other models despite it's diminutive size.